
Note: All exercises are illustrated by hand with a pen and written by Clemens Biedrawa.
Pavanmuktāsana 1 – The Joint Series in Kundalini Yoga
“Pavana”means wind—and in yoga, the wind is always also prāṇa, the breath, the life force.“Mukta”means liberated, released, unleashed.
Pavanmuktāsana is, therefore, the pose that releases the wind. Not just the wind in your belly, as some translations suggest, but the wind that’s trapped in your joints. In places where movement has been lacking for years, something builds up. The breath can no longer reach those areas. Energy becomes stagnant.
This series targets exactly those areas—from the toes to the neck, one joint at a time. It looks simple. It isn't.
Exercises for Rheumatism – āmavātī rodhaka vyāyāma
The pavanmuktāsana series was first introduced in the West by Swami Satyānanda, which led many people to believe that it originated there at the Bihar School of Yoga. This is a misunderstanding: pavanmuktāsana belongs to a much older tradition that was taught as part of sūkṣma vyāyāma —the subtle yogic exercises—and which we have already encountered through the teacher Dhīrendra Brahmacārī.
Here I demonstrate a variation of pavanmuktāsana as practiced in our Kundalini yoga tradition. This series for rheumatism is much more than just a series for joint pain. It is a very energetic series that can release energy blockages and also stimulate the flow of cerebrospinal fluid. It can expand consciousness and has powerful healing properties for both mind and body.
Since this series has a strong effect on the flow of energy along the spinal cord, it is recommended that you relax in śavāsana whenever you feel a tingling sensation. This helps calm the nervous system and integrate the energy generated.
How to Practice This Series
Since this series is meant to be subtle rather than focusing solely on the physical body, it should be practiced with an emphasis on breathing and rhythmic movement.
- Breathing first. Every movement follows the breath, not the other way around. Deep, rhythmic, clear.
- Gaze and attention. Wherever your eyes go, that's where you go. Keep your gaze steady as you move.
- Kumbhaka at the end of each exercise. Hold your breath—with mūlabandha—for as long as is comfortably possible. Hold your breath until a sense of stillness arises in the center.
- Take a break now and then. When you feel a tingling sensation coming on: lie down, do śavāsana, and let it sink in.
- Duration. About 60–90 minutes for the entire series.
In my opinion, the only difference between Hatha and Kundalini yoga is the concentrated focus on kumbhaka. When kumbhaka is practiced with complete concentration, even the simplest exercise becomes Kundalini yoga.
Pavanmuktāsana 1 – The Exercises Step by Step
Prāraṃbhik Sthiti – Basic Position
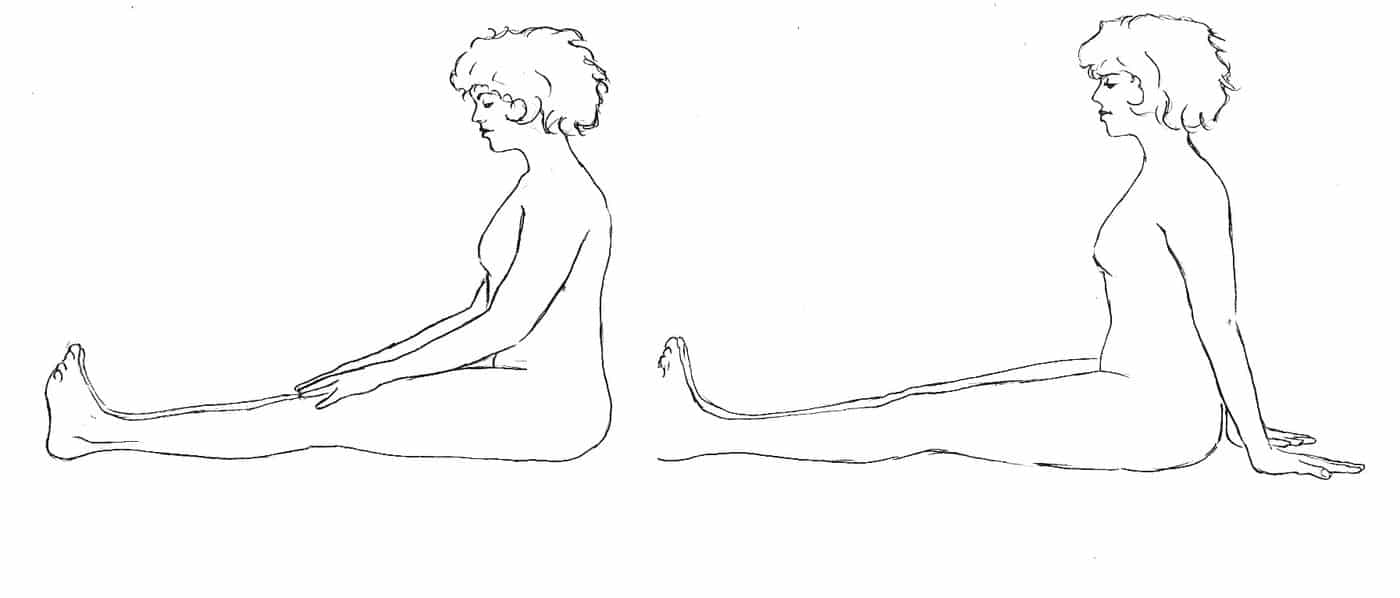
Sit with your legs extended and place your hands either on your knees or behind your buttocks, with your fingers pointing backward. Make sure your spine is straight and that your posture embodies energy.
This is the starting position to which you return between many exercises.
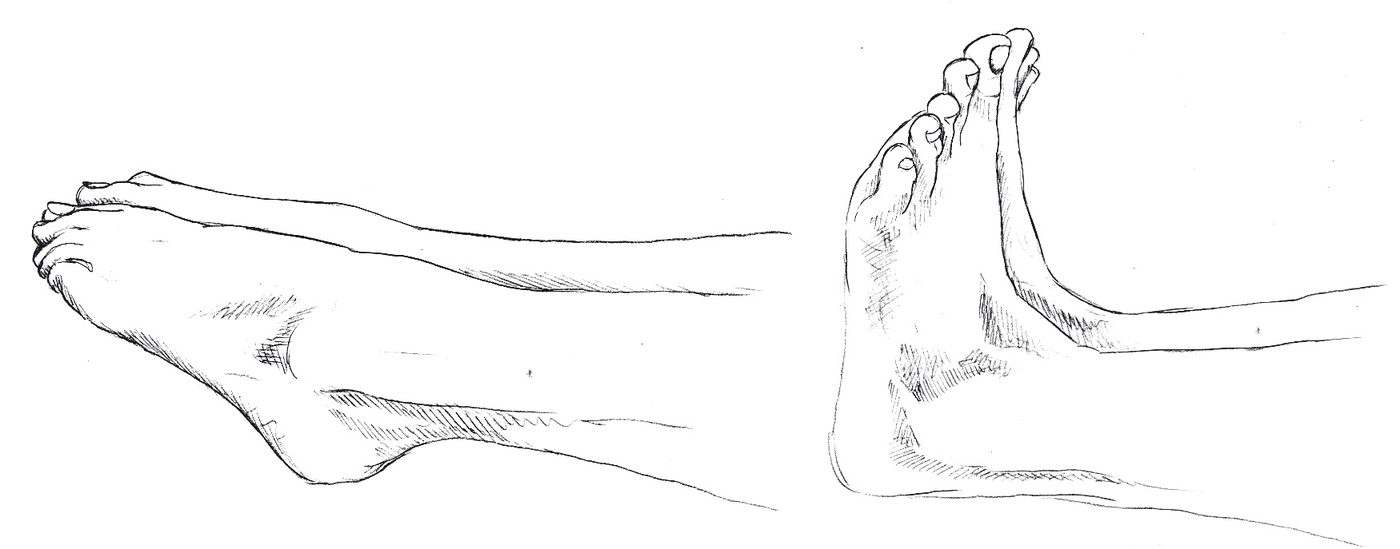
Pādāṅguli naman – Toe bends
Sit in the basic position with your legs extended and your feet slightly apart, and focus on your toes. Keep your face open and your eyes fixed firmly on your toes. Wherever your eyes go, that’s where you go. Since these exercises are subtle, it’s important that you stay in the right place.
Bend your toes forward and back toward your body in time with your breath. Your breath should be deep and intense throughout the entire exercise to stimulate the prāṇa and allow it to flow.
At the end, inhale and curl your toes toward your body, holding your breath. Then exhale and point your toes away from your body, holding your breath as you do so.
Deep, rhythmic breathing for 1–2 minutes.
Kulph naman – Ankle bends
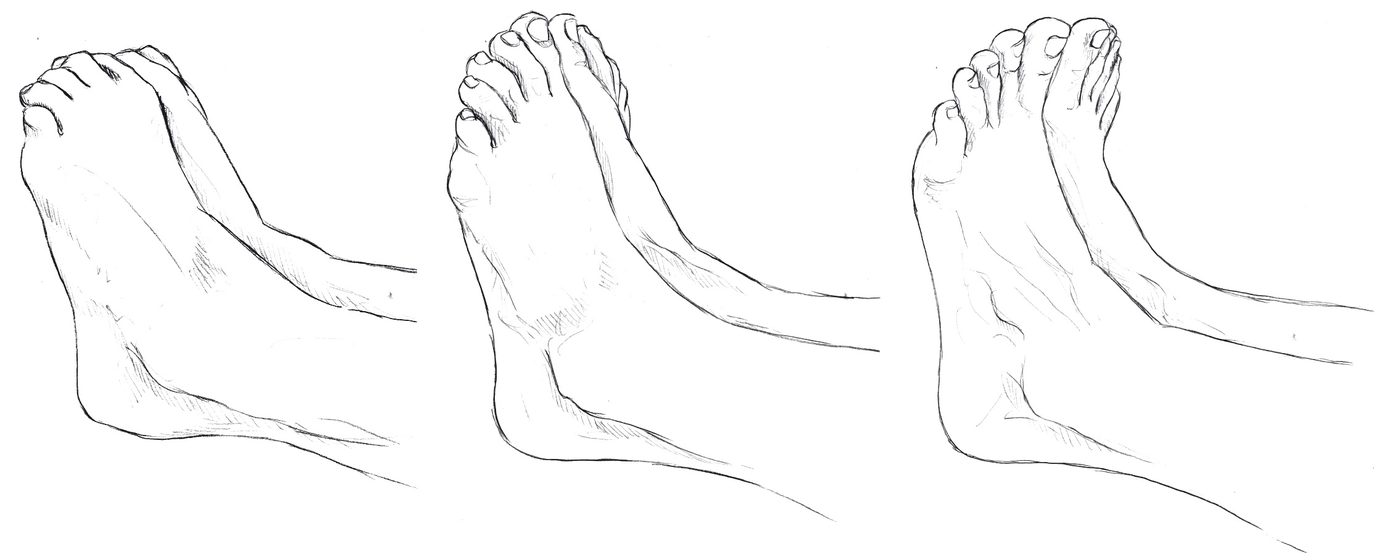
Stay in the same position and begin to bend your feet forward and backward from the ankles in the manner described earlier. Keep your breathing rhythmic and passionate. At the end of the exercise, gently hold your breath as you inhale and exhale.
Deep, rhythmic breathing for 1–2 minutes.
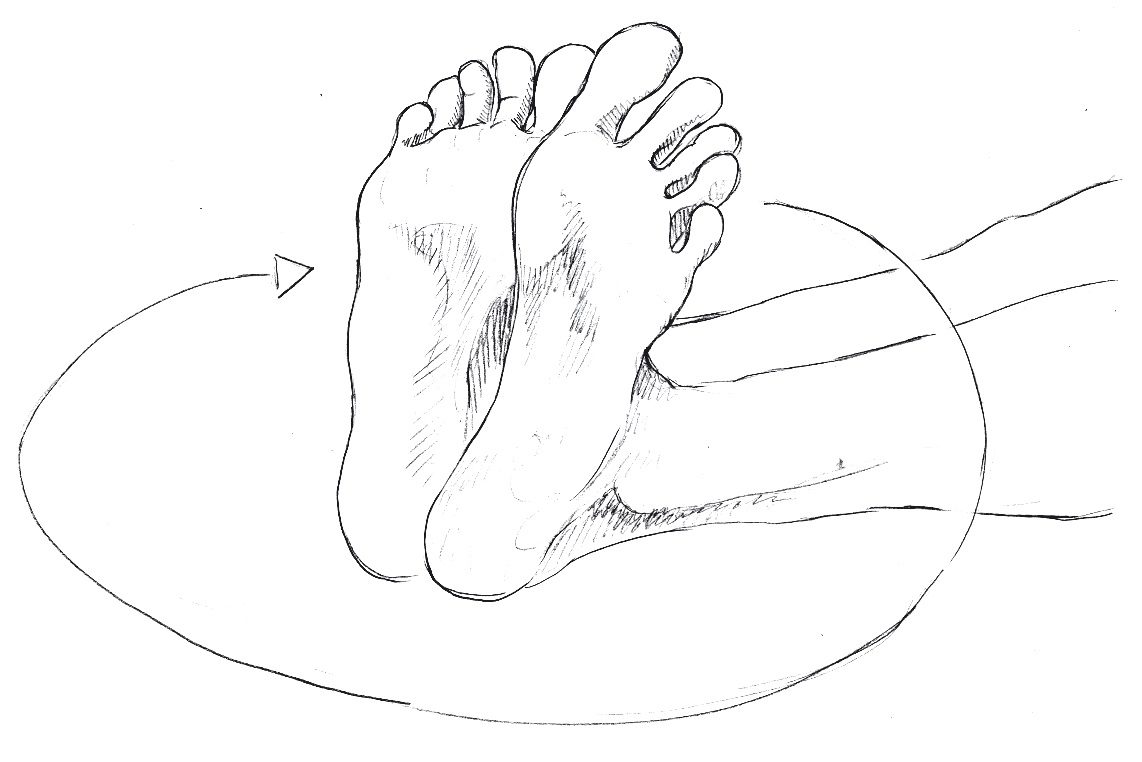
Kulph cakra – Ankle rotation
Stay in the same position and bring your feet together so that they touch on the inside. Begin by rotating both feet from the ankles. Observe the rotation with innocent curiosity, just as a child would watch a new and fascinating toy. Nothing is trivial—allow the exercise to unfold its magic. Synchronize the movement with your breath. After a while, change the direction.
Step 2. Open your feet slightly, placing them just 20 cm apart. Begin by rotating your feet in opposite directions, starting from the ankles. Synchronize this movement with your breath. Keep your breath deep. When you’re done, inhale and gently direct your breath toward your center while drawing your feet toward your body. Exhale, hold, and push your feet away from your body. Change direction and repeat the exercise.
Deep, rhythmic breathing for 1–2 minutes.
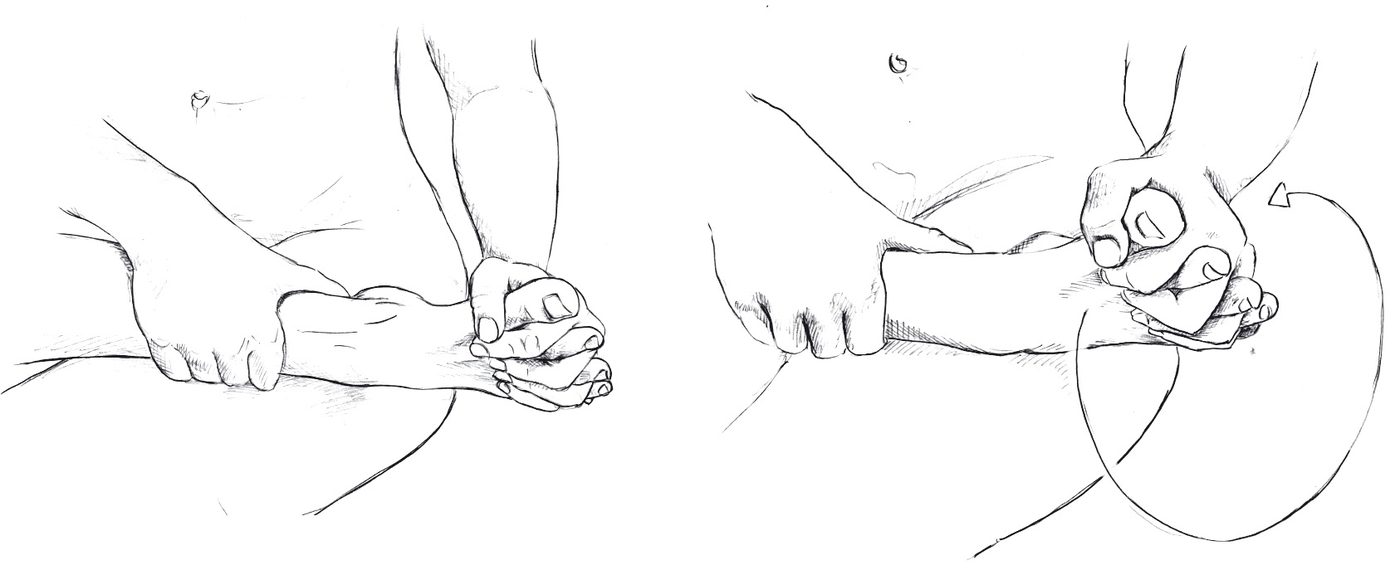
Kulph ghūrṇan – ankle crank
Grasp your right knee with both hands, lift your knee, and pull it toward your chest; press your knee outward, then take your right ankle and gently place it on your right thigh.
Hold your ankle firmly with your right hand; feel that your grip is strong and secure. Take the fingers of your left hand and interlace them with the toes of your right foot, one finger at a time.
Once you’re in this position, straighten your spine and open your chest, look inward, and slowly begin to rotate your right foot in time with your breath. As you inhale, move your foot upward; as you exhale, press it downward. Be aware that the movement is deep and that the foot itself is not actively involved in the movement. Give it your full attention, like a curious child.
At the end, take a breath and hold it. Take your time. Then exhale, hold, and relax. Gently move your leg outward horizontally, bring your knee toward the center, and straighten your right leg again. Repeat the same on the other side.
Deep, rhythmic breathing, 1–2 minutes on each side.
Jānuphalak ākarṣaṇ – Patellar Contraction
Return to the starting position with your legs extended. Place your hands on your knees, with your thumbs and index fingers resting on either side of your kneecaps.
In time with the rhythm of your deep breathing, contract the muscles in your thighs so that your kneecaps are lifted upward. At the end of the exercise, hold your breath and keep your kneecaps gently lifted after inhaling. Then exhale slowly and relax them. Enjoy the internal massage of your knees—vitality will flow.
Deep, rhythmic breathing for 30 seconds to 1 minute.

Jānu naman – Squats
From the starting position, place both hands under your right knee and interlock your fingers with your palms facing up. Then pull your knee toward your chest and exhale as you lengthen your spine. Inhale and extend your leg across the floor with your arms outstretched. Keep your gaze fixed on your toes.
Breathe in a deep, steady rhythm as you straighten and bend your knee. Keep your chest open. Let the rhythm carry you. Repeat the exercise on the other side.
Deep, rhythmic breathing for 1–2 minutes on each side.
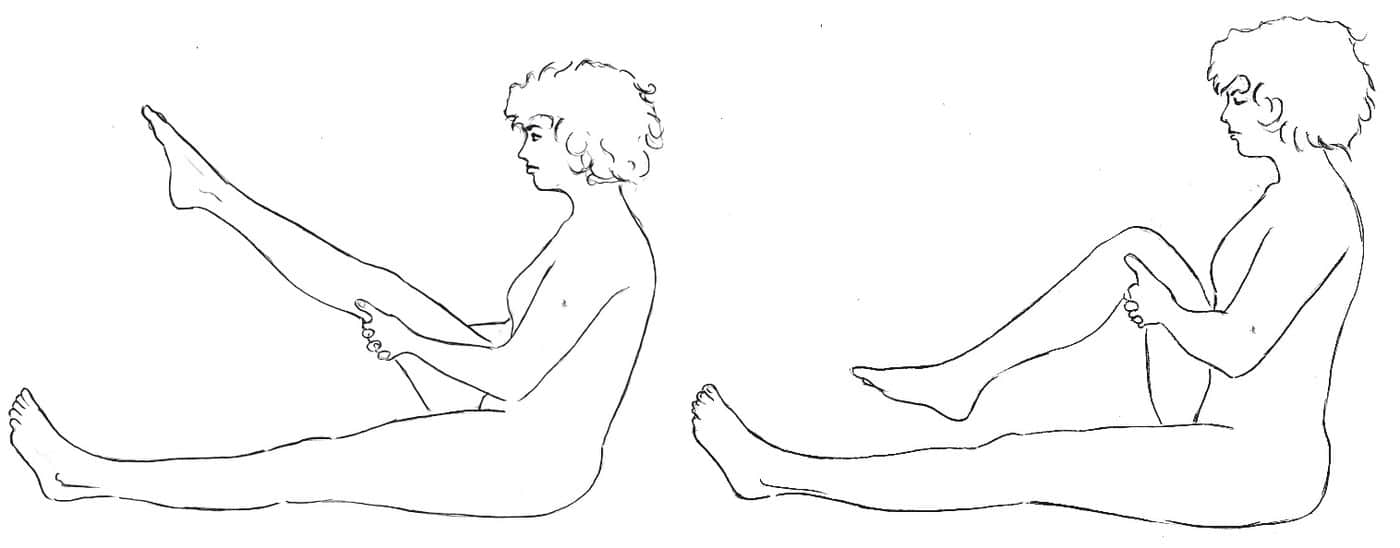
Jānu cakra – Knee Joint Rotation
As in the previous exercise, hook your fingers under your thigh, open your chest, and lift your knee. Gently begin to trace a circle with your foot and lower leg while keeping your thigh in place. Your thigh will rotate gently outward and inward, but without your knee moving up or down.
Synchronize the movement with your deep breathing. Straighten your leg as you inhale, and bend it as you exhale. At the end, take a deep breath, hold it, exhale, and relax the pose.
Focus on this movement—if you lose yourself in it, the movement will naturally become meditative.
Deep, rhythmic breathing, 1–2 minutes on each side.
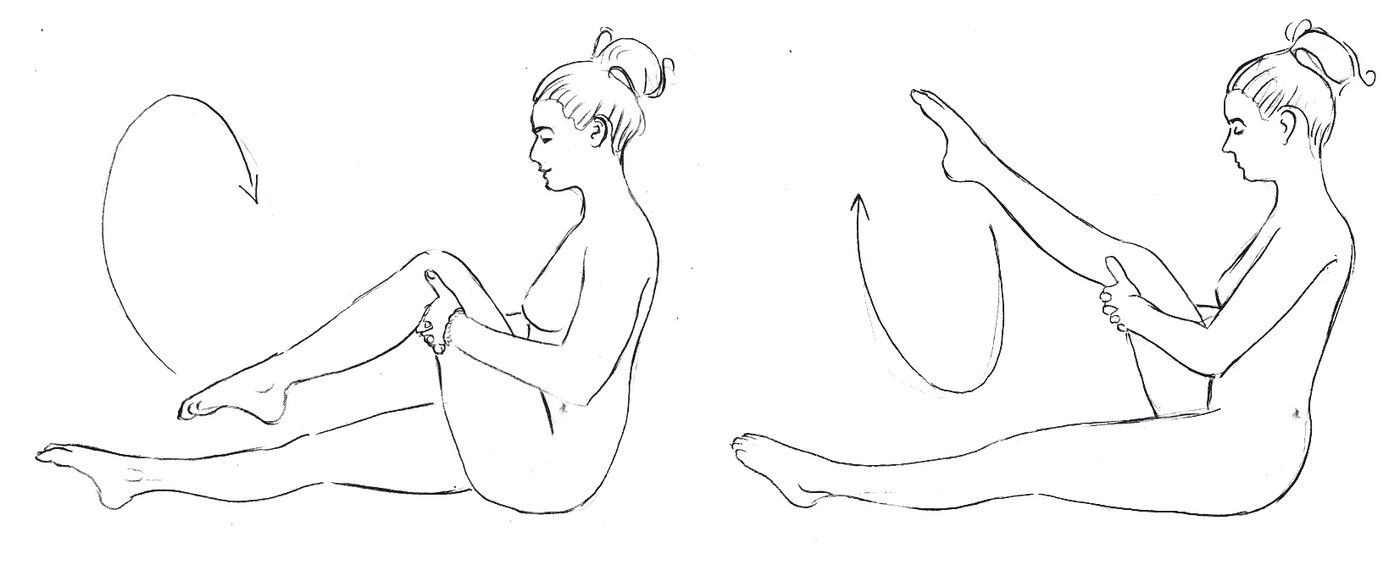
Ardha Titalī Āsana – Half Butterfly Pose
Starting from the basic position with your legs straight, lift your right knee, move it to the side, and rest your right ankle on your left thigh. Once again, interlace the fingers of your left hand with the toes of your right foot, starting with the little toe and working your way up one by one. Straighten your spine and relax your face. If you’d like, close your eyes and turn your gaze inward.
Slowly begin to pull your leg toward your chest as you inhale. As you exhale, press it toward the floor. Move your hand in circular motions around your knee, gently pulling and pressing it. Gradually increase your speed and rhythm, and focus your gaze inward.
After a while, inhale and straighten your spine. Hold your breath and gaze into the stillness. Exhale gently, press your knee to the floor, and hold your breath there. Move your foot outward, lift your knee, and then straighten your leg. Repeat the same process on the other side.
Deep, rhythmic breathing, 1–2 minutes on each side.

Pūrṇa titalī āsana – Full Butterfly Pose
From the starting position with your legs extended, bring both knees toward your chest as in bījāsana and gaze toward your center. Straighten your spine and feel the sky above you. After a few breaths, gently open your knees and bring your hands between your legs. Interlace your fingers, hold your feet from below, and rest your thumbs on your big toes. Then bring your feet to the floor and lengthen your spine.
Then gently begin to move your legs up and down like a flying butterfly. Keep your breath deep. Move slowly, then faster, and finally slowly again. Your breathing doesn’t have to be synchronized with the movement. Smile and enjoy flying like a butterfly. At the end, inhale, stretch toward the sky, exhale, and bend forward. Hold the stretch for a few breaths.
Flutter like a happy butterfly for 2–3 minutes.

Śroṇi cakra – Hip Rotation
Return to the same position as in ardha titalī āsana. Rest your right hand on your right knee.
Start slowly, with an open expression and focused attention, rotating your knee in a circle. Synchronize your breathing with the movements. As you inhale, move your knee upward. As you exhale, move it downward. Move with the utmost attention—this happens inwardly. After a while, change the direction.
Move your foot outward, lift your knee, and then straighten your leg. Repeat the same process on the other side.
Deep, rhythmic breathing, 1–2 minutes on each side.
Makra vyāyāma – the Crocodile Pose
From the starting position, lift your knees and place your feet on the floor. Spread your legs so that your feet are about 40 cm apart. Bring your arms behind your body, with your fingers pointing backward; your arms stabilize your torso as you lift it upward.
Breathe in and open your chest. Breathe out and let your legs fall to the left while turning your head to the right. Breathe in and bring your knees back up and your head to the center. Breathe out, let your knees fall to the right, and turn your head to the left.
Move from side to side in this way, breathing deeply and rhythmically. 1–2 minutes.
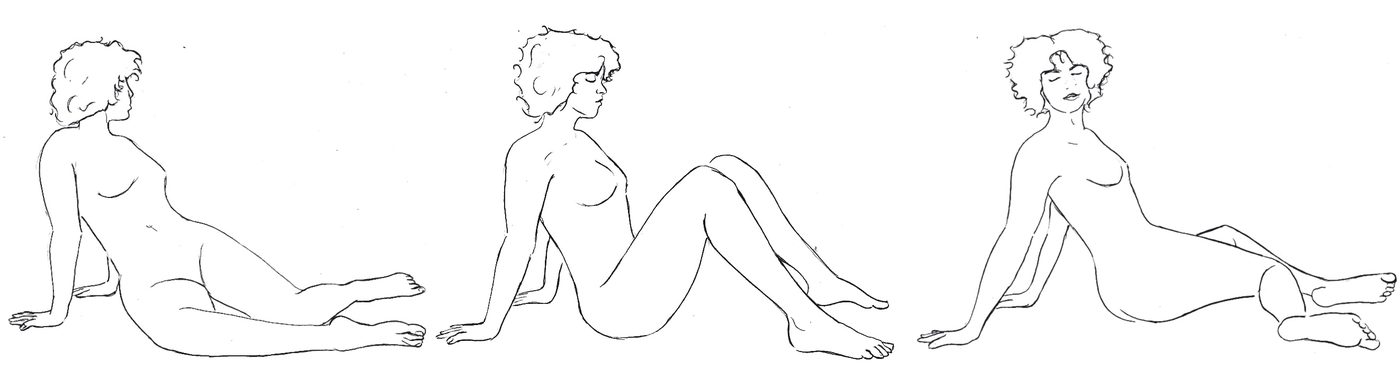
Step 2. Then bring your feet and knees together as shown in the illustration and perform the same exercise with your legs together, so that the sensation travels upward along the spinal cord.
Move from side to side while breathing deeply and rhythmically. 1–2 minutes.
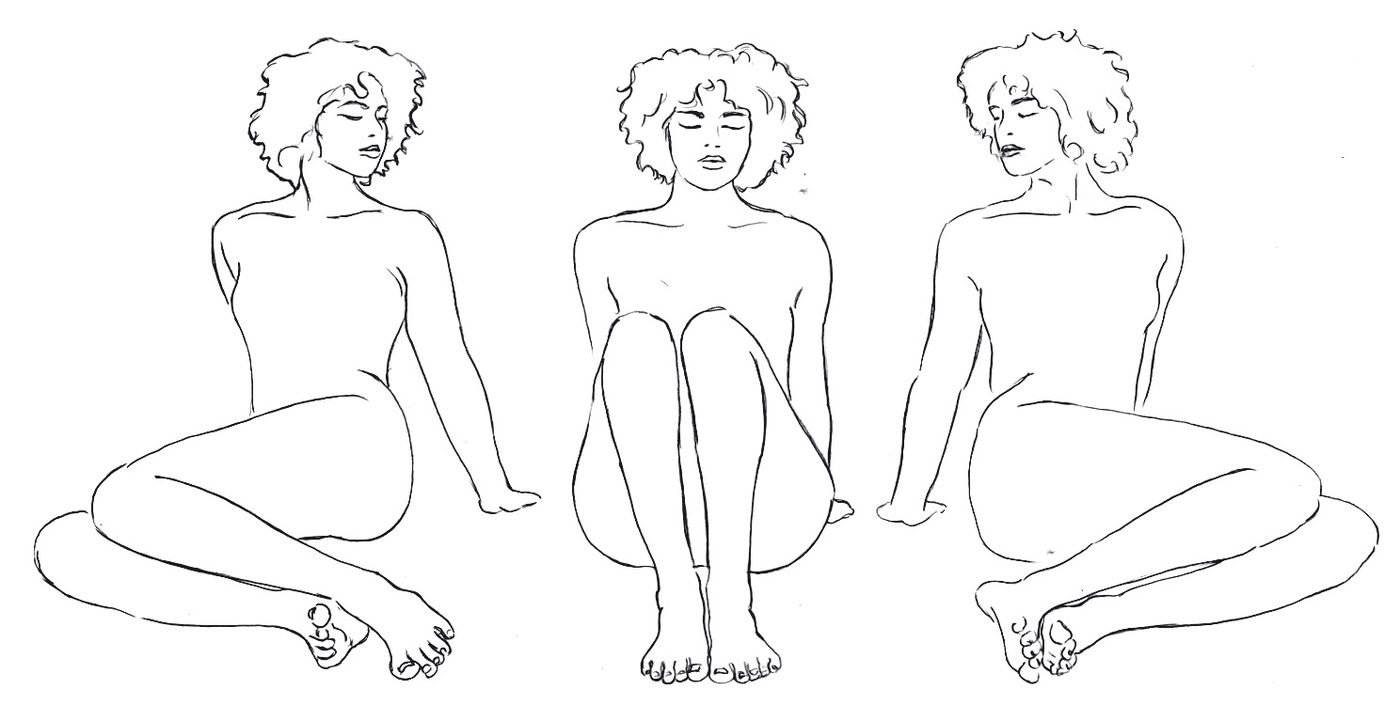
Śavāsana – the relaxation between poses
Then lie on your back with your palms facing up. Let the vibrations spread out in the silence.
This exercise stimulates the spinal cord like no other. A deep relaxation period of at least 2 minutes is essential. Don't skip it—this is where you integrate what you've just created.
Muṣṭika bandha – Clasping the Hands
Sit in sukhāsana, centered within yourself, and extend your arms forward, spreading your fingers wide. Keep your gaze fixed straight ahead. As you exhale, clench your fists with your thumbs tucked inside; as you inhale, spread your fingers wide again. Find a comfortable rhythm.
At the end, inhale, open your hands, hold the pose, and look inward. Then exhale slowly.
Deep, rhythmic breathing for 1–2 minutes.
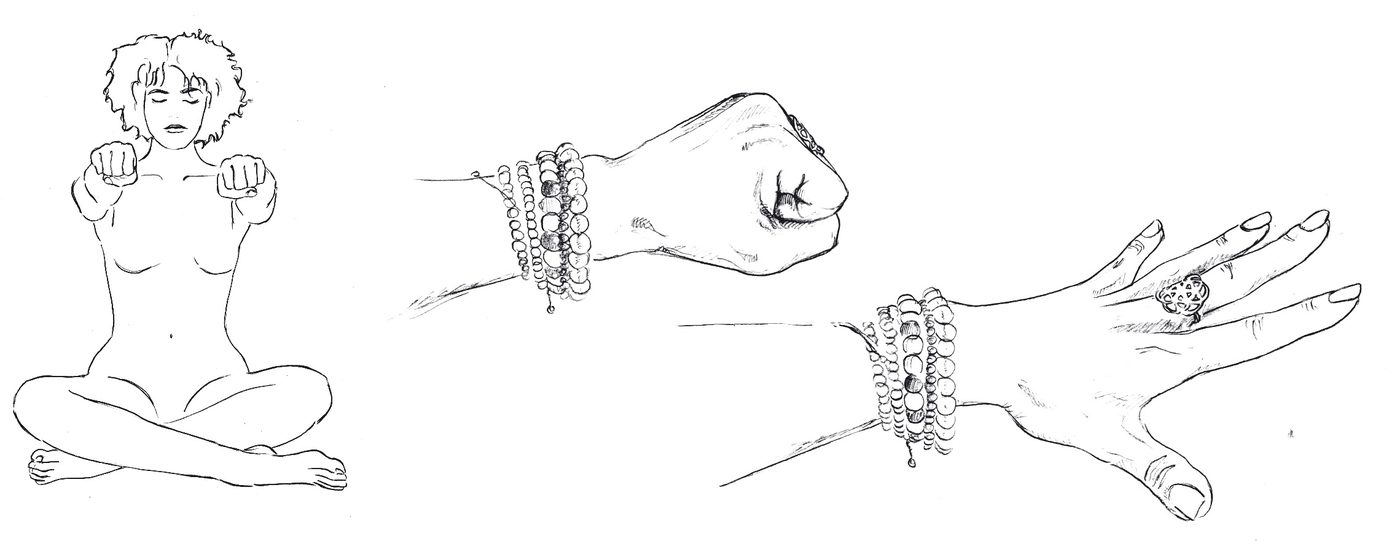
Maṇibandha naman – Wrist Bends
Stay in the simple pose with your arms extended horizontally in front of you. Close your fingers, but keep them straight, and begin to bend your wrist. Inhale and press your palm forward and your fingers upward. Exhale and bend your hand downward from the wrist. Maintain a good, rhythmic pace here as well.
At the end, inhale, press your palm forward, and hold the position. Then exhale slowly and relax.
Deep, rhythmic breathing for 1–2 minutes.

Maṇibandha cakra – Wrist Rotation
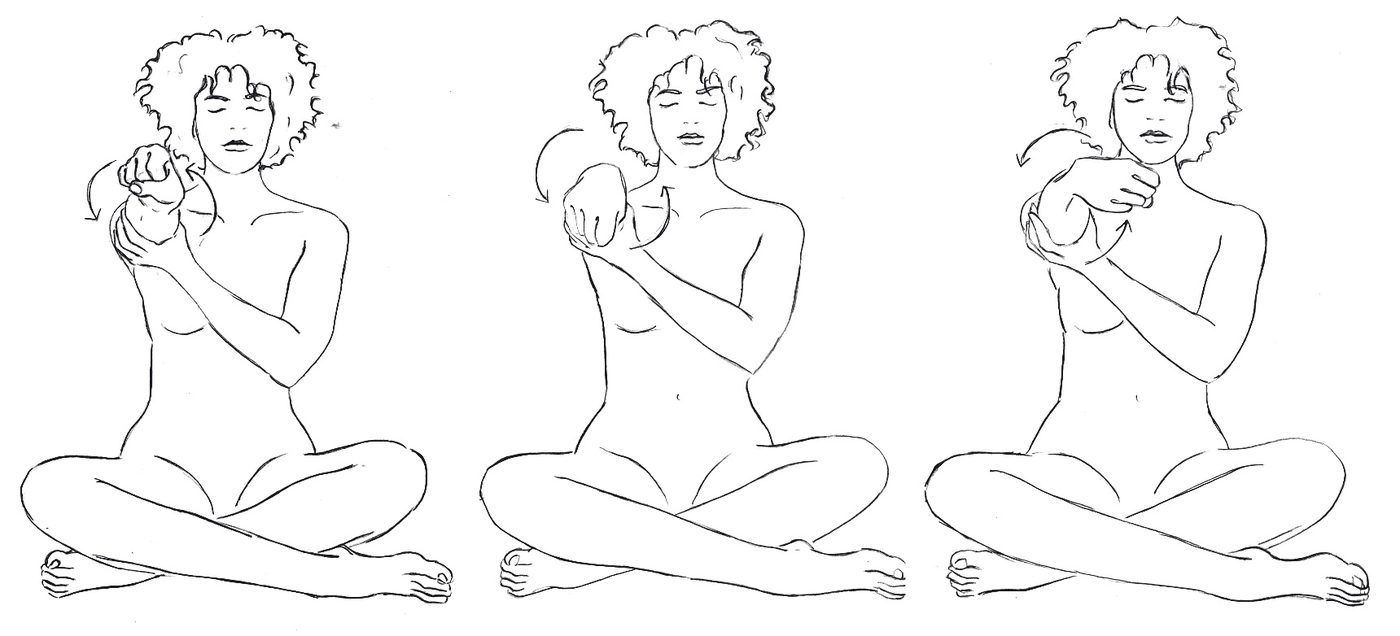
Remain seated in sukhāsana with your arms extended in front of you. Support your left arm with your right hand directly beneath the elbow. Clench your fingers into a fist with your thumb in the center. Very slowly and with full attention, begin to rotate your fist from the wrist, keeping your palm facing down at all times. Synchronize the movement with your breath.
At the end, inhale, turn your fist upward, and maintain your center. Then exhale slowly and relax both arms. Repeat the exercise on the other side.
Deep, rhythmic breathing for 1–2 minutes on each side.
Kaphoṇi naman – Elbow Bends
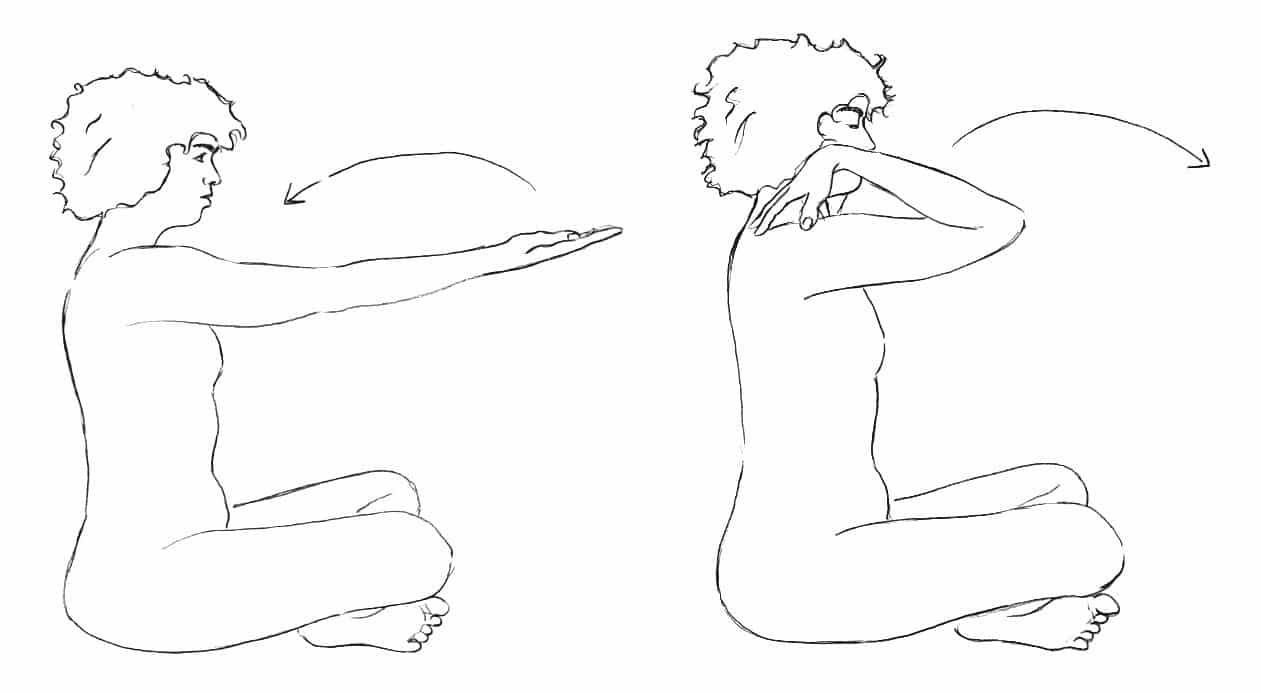
Extend both arms to the sides, palms facing up, and inhale—this opens mahā-prāṇa, the great energy. Then bring both arms forward and spread your fingers slightly so that they form a bowl-like shape.
As you exhale, bend your elbows to bring your hands toward your shoulders. Straighten them again as you inhale. Find a good, rhythmic pace. At the end, extend your arms and hold the position. Exhale slowly and relax.
Deep, rhythmic breathing for 1–2 minutes.
Skandha Cakra – Shoulder Rotations
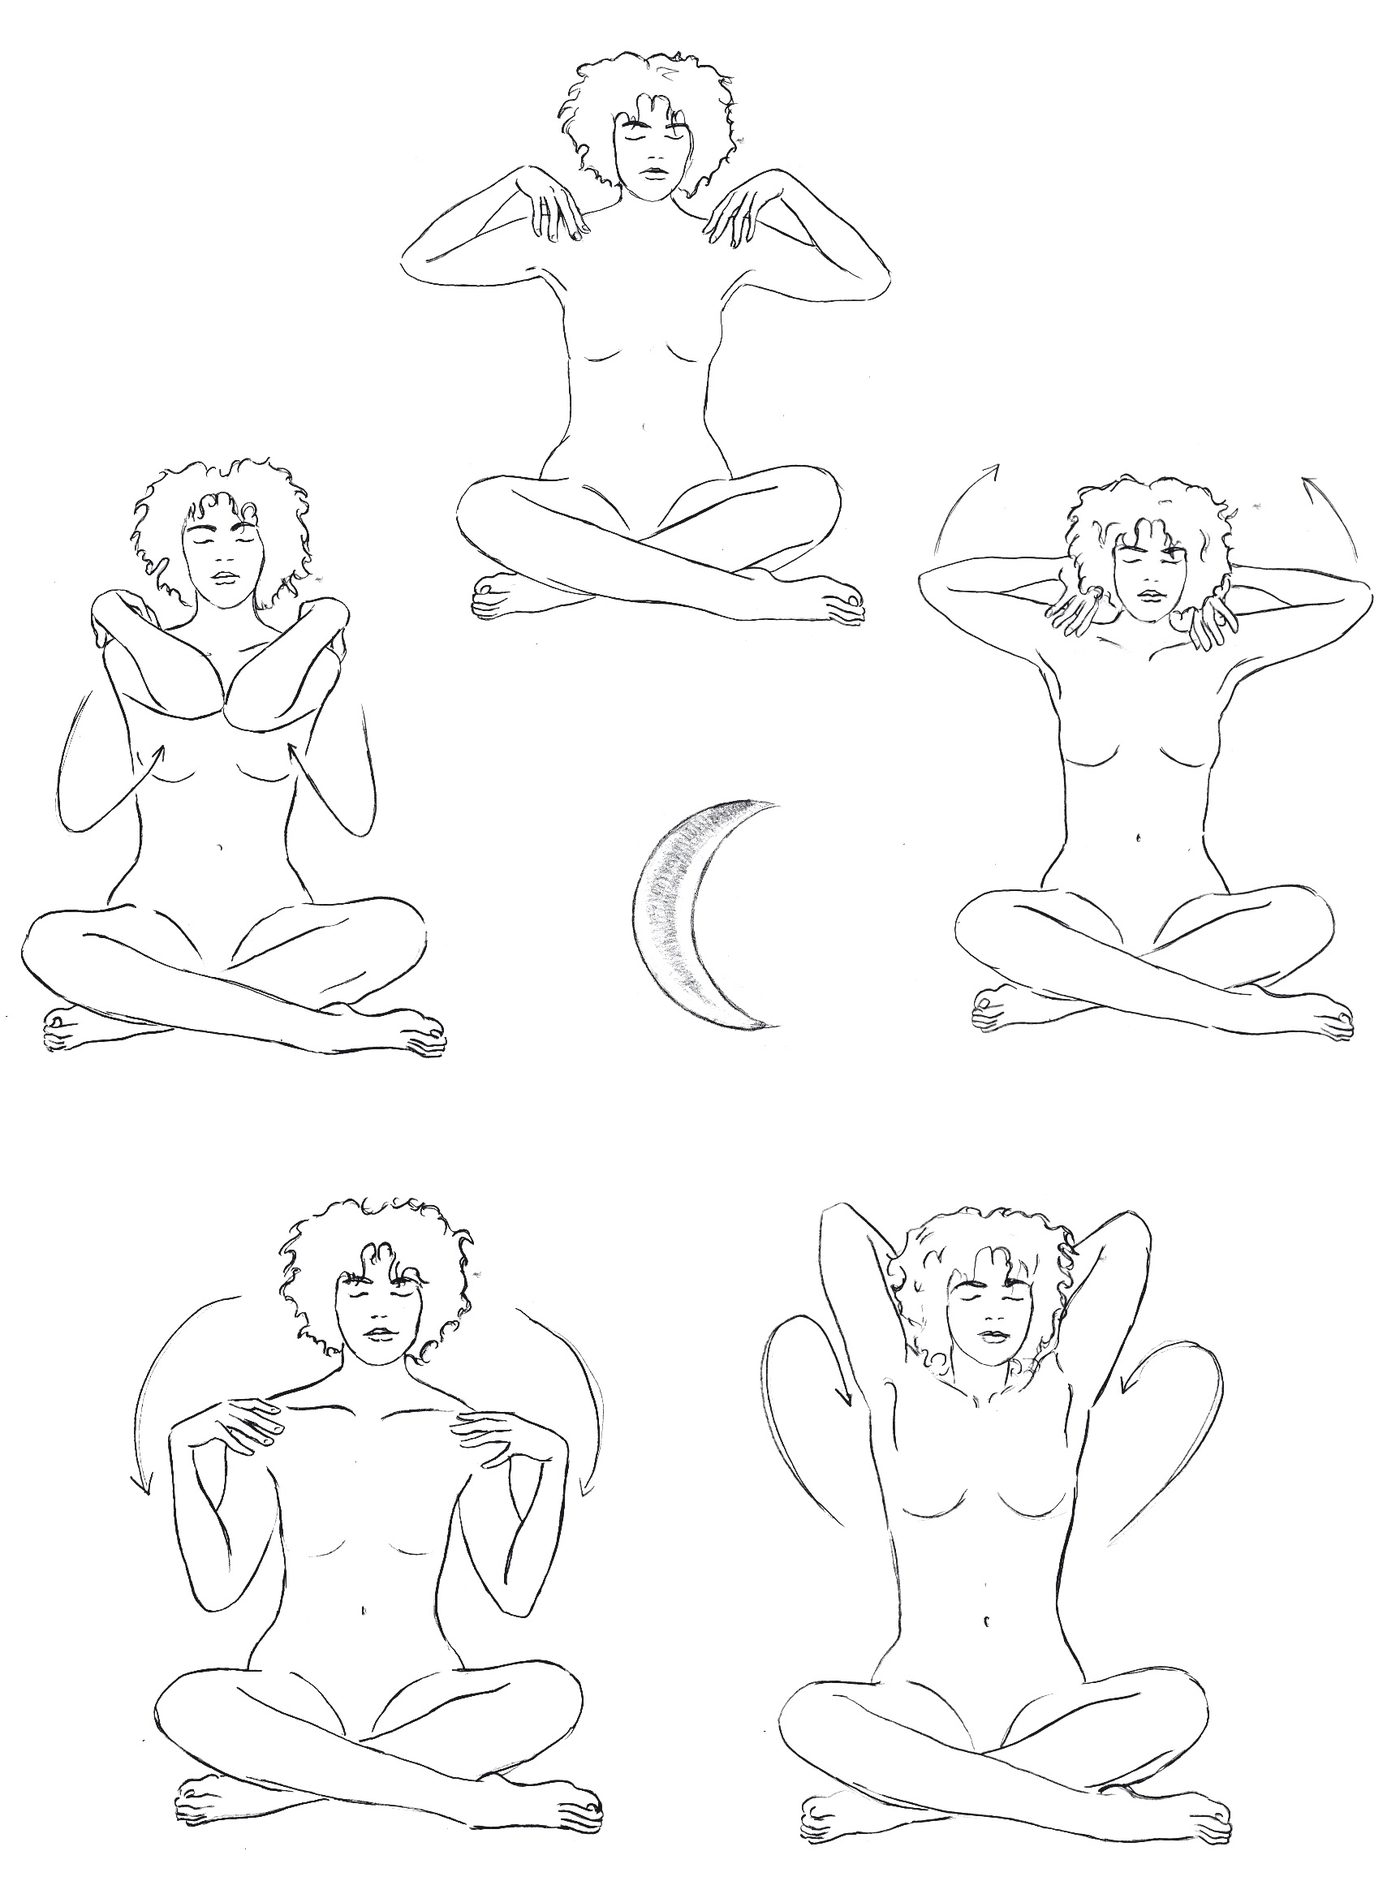
Open your arms to the sides, palms facing up. Place your hands on your shoulders, with your fingers forming a bowl-like shape. Inhale and raise your elbows very slowly until your hands meet behind your neck. Slowly bring your elbows behind you and let your arms rotate backward and downward. Draw a complete circle.
As you move your arms forward, exhale and draw your chest in. The insides of your elbows should touch in front of your face as your arms rotate forward. Rotate your arms slowly while breathing deeply, and switch directions after 5–10 repetitions.
Deep, rhythmic breathing, 1–2 minutes in each direction.
Grīva sañcālana – Neck Movements
Sit up straight and gently begin turning your head to the left as you inhale, and then to the right as you exhale. Breathe slowly and deeply. After a while, reverse your breathing. As you move your head, be sure to gently explore the full range of motion in your neck by turning your head as far as possible to the left and right.
Then come to the center and begin to slowly turn your head along your chest and neck. Slowly and deliberately roll your head from one shoulder, across your neck, toward your chest, and to the opposite shoulder. Synchronize your breathing with the movement. After a while, reverse the movement. Sink deeply into the movement, and take your time exploring the full range of motion.
Move your head while breathing deeply and rhythmically, for 1–2 minutes in each direction.

Jālandhara bandha – the cosmic water lock
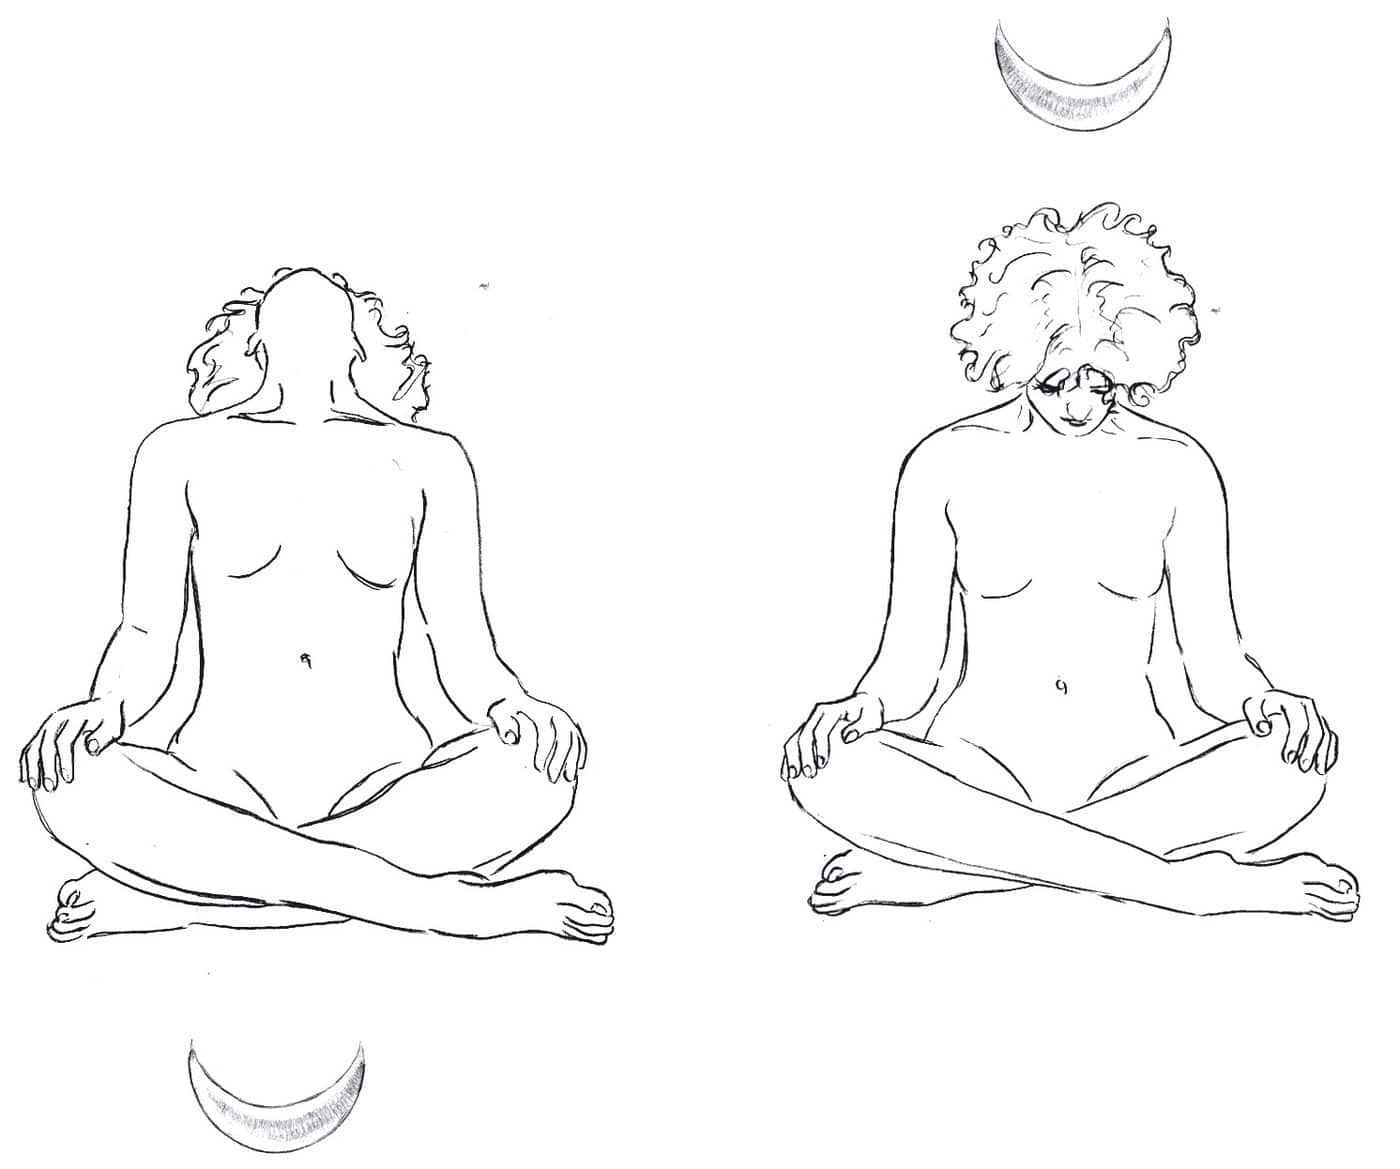
Sealing the Source of Cosmic Nectar. Breathe in and tilt your head back; feel the gentle pressure in the back of your neck. Close your eyes and imagine yourself gliding up into the sky. A bright light shines on your forehead. Breathe deeply and be still.
Then, after a few breaths, bring your chin to your chest as you exhale, look inward, and bow to the vast cosmos. Breathe deeply.
Stay in each position for about 3–5 breaths. Silence.
Bīja nyāsa – the placement of seed syllables
Sit in the meditation posture. Stretch and open your arms. Engage mūlabandha at the beginning of each sound, and place the seed sounds, the bīja, in their respective locations within the body.
Sound is not just an afterthought here. It is what connects the open joints—what transforms twenty-one individual exercises into a single, continuous movement of consciousness. You can find out more about this inner map in our article on the chakras and their history.
Finally, fold your hands in front of your heart in namaskāra mudrā and breathe calmly.
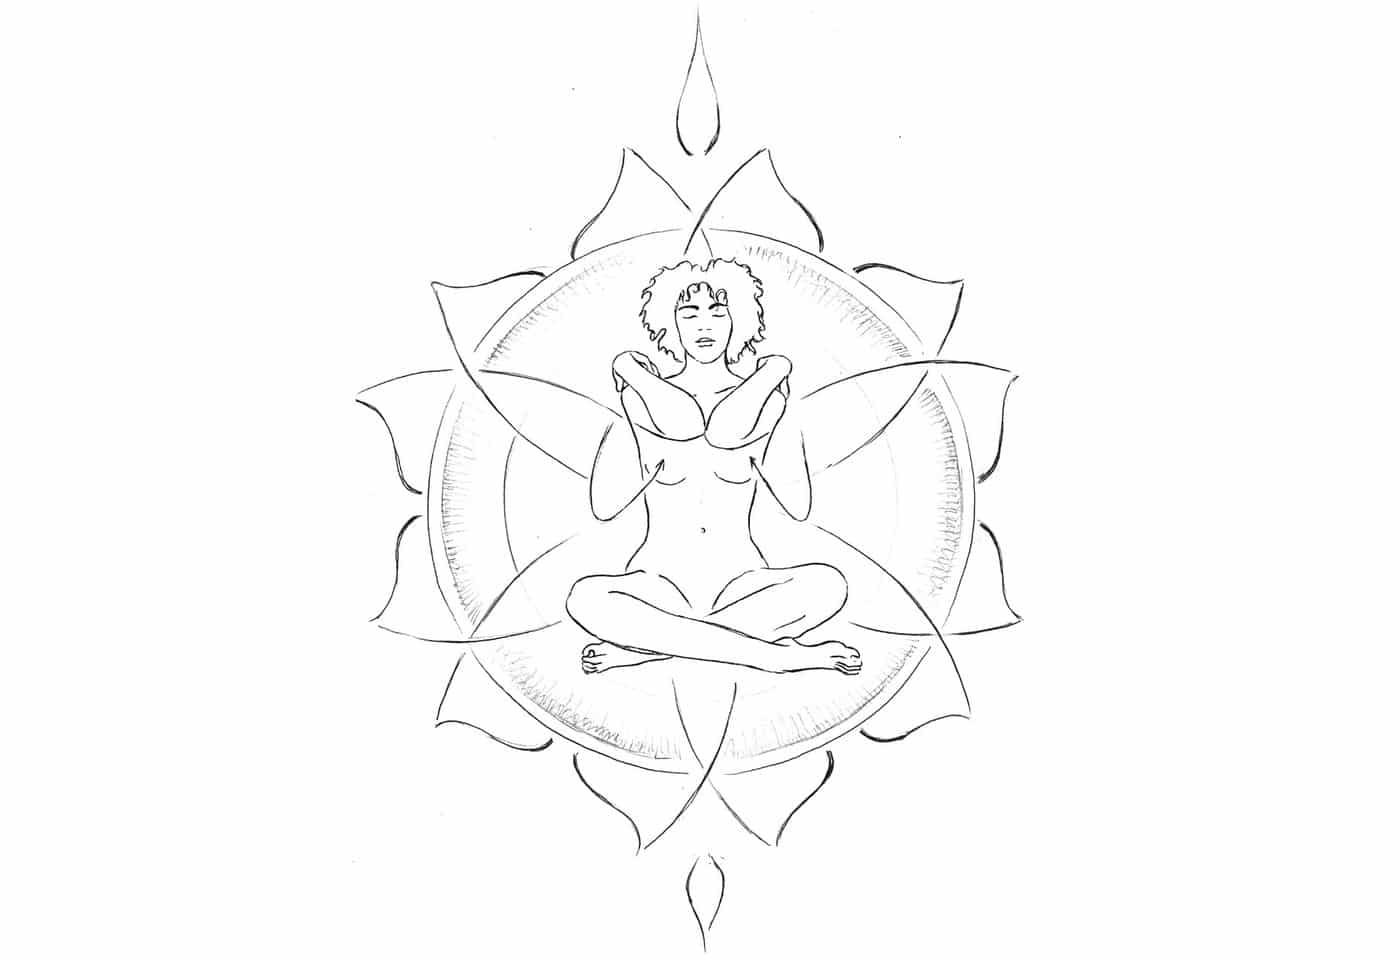
Śavāsana – Corpse Pose
Lie on your back with your palms facing up. Gaze out at the ocean of life—your home.
Be grateful.

Series Overview
- Prāraṃbhik Sthiti – Basic Position
- Pādāṅguli naman – Toe bends
- Kulph naman – Ankle bends
- Kulph cakra – Ankle rotation
- Kulph ghūrṇan – Ankle twist
- Jānuphalak ākarṣaṇ – Patellar Contraction
- Jānu naman – Squats
- Jānu cakra – Knee Joint Rotation
- Ardha titalī āsana – Half Butterfly Pose
- Pūrṇa titalī āsana – Full Butterfly Pose
- Śroṇi cakra – Hip Rotation
- Makra vyāyāma – Crocodile Exercise
- Śavāsana – Corpse Pose
- Muṣṭika bandha – Hand Clasp
- Maṇibandha naman – Wrist Bends
- Maṇibandha cakra – Wrist rotation
- Kaphoṇi naman – Elbow Bends
- Skandha cakra – Shoulder Rotations
- Grīva sañcālana – Neck Movements
- Jālandhara bandha – Cosmic Water Lock
- Bīja nyāsa – Placement of the seed syllables
- Śavāsana – Corpse Pose
Pavanmuktāsana 1 is the first of three parts. Part 2—the udarapoṣaṇa series —focuses on the abdominal region, digestion, and willpower. Part 3 specifically addresses energy blockages. Together, they form the foundation upon which everything else in our school is built—from the From the Sun Salutation to the Moon Salutation and on to the Chakra Kriyas.
Swami Satyananda, the Bihar School of Yoga, and Pavanmuktāsana—Frequently Asked Questions
Who was Swami Satyananda Saraswati?
Swami Satyananda Saraswati (1923–2009) was a disciple of Swami Sivananda of Rishikesh. He was also the teacher of one of my important teachers, Swamiji Vidjanand. For this reason, we often refer to this eminent yoga teacher in our practice. In 1963, Satyananda founded the Bihar School of Yoga in Munger, Bihar. His great contribution lies in systematization: he transformed yogic techniques—which had previously been passed down orally and often only to individual students—into a clear, teachable form.
His book *Asana Pranayama Mudra Bandha* remains one of the most widely used standard texts in yoga teacher training worldwide.
What is the Bihar School of Yoga?
The Bihar School of Yoga is a yoga institution located in Munger, in northern India, on the banks of the Ganges. It pioneered what is now known internationally as “Satyananda Yoga” or “Bihar Yoga”—a synthesis of Hatha Yoga, Rāja Yoga, Kriyā Yoga, and tantric elements. Through its affiliated Yoga Publications Trust, many classical techniques were systematically adapted for a Western audience for the first time.
Did the Bihar School of Yoga invent Pavanmuktāsana?
No. That is the most common misconception about this series. Swami Satyānanda introduced pavanmuktāsana to the West and divided it into three clearly structured parts—which is why it is often equated with Munger. The exercises themselves, however, belong to a much older tradition: sūkṣma vyāyāma, the subtle yogic exercises.
What is sūkṣma vyāyāma—and who was Dhīrendra Brahmacārī?
Sūkṣma means subtle, delicate; vyāyāma means practice. This refers to movements that address not the muscles but the energy body—small, precise, repeated movements that guide the breath into a joint. Dhīrendra Brahmacārī documented and taught these sequences of exercises in the 20th century, thereby bringing to light an older lineage from which pavanmuktāsana also originates.
Why is the series called the “Anti-Rheumatism Series”?
The Sanskrit name is āmavātī rodhaka vyāyāma —literally, “exercises that ward off āmavāta.” In Ayurveda, āmā refers to undigested matter, similar to metabolic waste; vāta is wind. Āmavāta thus describes a condition in which undigested matter is carried by the wind into the joints—the Ayurvedic metaphor for rheumatic ailments. The series mobilizes each joint individually and brings movement precisely where it is lacking.
What does Pavanmuktāsana have to do with Kundalini Yoga?
At first glance, it seems like very little—after all, they’re “just” joint exercises. But on closer inspection, it’s everything. The sequence has a powerful effect on the flow of energy along the spinal cord and stimulates the cerebrospinal fluid. It is precisely there, along the suṣumṇā, that Kundalini Yoga takes place. And the crucial point is kumbhaka, the conscious holding of the breath with mūlabandha at the end of each exercise. When kumbhaka is performed with complete concentration, even the simplest exercise becomes Kundalini Yoga. You can find more on this in our article on Hatha and Kundalini Yoga.
How does your version differ from the classic Satyananda version?
The way pavanmuktāsana is presented here is somewhat different from the original method taught by Satyānanda. We teach it as is customary in our Kundalini Yoga tradition: with a much stronger emphasis on kumbhaka, mūlabandha, the inner gaze, and integration into śavāsana. For us, the series is less about joint exercises and more of an energetic practice that culminates in bīja nyāsa and meditation within Sound Yoga.
How often and for how long should I practice Pavanmuktāsana 1?
The complete series takes about 60–90 minutes. You can practice it as a standalone session or use parts of it as a warm-up before a kriyā. Especially when you’re just starting out, it’s a good idea to take your time: it’s better to do seven exercises with full breath and full attention than twenty-one in a rush.
Who is this series intended for?
It’s for just about everyone. It requires no flexibility, no strength, and no prior experience—it’s practiced while sitting or lying down. That’s why it’s an ideal starting point for beginners, older adults, and anyone who wants to get back into movement after an injury or a long break. For experienced yogis, it’s a school of mindfulness.
Where can I learn Pavanmuktāsana 1 with step-by-step instructions?
In our Kundalini yoga classes in the Wachau region, this series is an integral part of our practice. We cover it in detail—including background information and teaching methods—in the RYT 200-hour yoga teacher training program and explore it in greater depth in the RYT 300-hour training program. If you’re already teaching, the YACEP Kundalini Yoga continuing education program is the right choice for you. All formats are also available as online and hybrid courses —and in Austria, you may be eligible for financial support for your training.
Even more inspiration for you
If you'd like to explore this topic further, feel free to check out our downloads section.
There you'll find a carefully curated selection of Kundalini yoga kriyas, mantras, and other wonderful ideas that I've put together for you.
And if you'd like to know who's behind this school: Who We Are. You can find our books here —such as the book on the chakras in yoga, from which this series is also based.